

Harvesting a variable field and grain drying tips
Harvesting a variable field and grain drying tips
We have seen a wetter growing season than the previous few years. In some regions, the higher-than-average moisture delayed seeding, and impacted crop emergence and development. Variability in maturity within the same field is also common this year. All of these factors bring added challenges to harvest and September's moisture is making things even tougher. To help make harvest smoother, keep reading.
How to assess fields with variable maturity?
Managing variable maturity starts with assessing the field. Variable maturity often occurs in two ways:
1. Patches of the field mature later than the rest: this is often found in fields with topography. The low-lying areas experience more flood stress. They either have greener, less mature plants than the knolls, or the stressed plants have turned yellow and produce minimal grains.
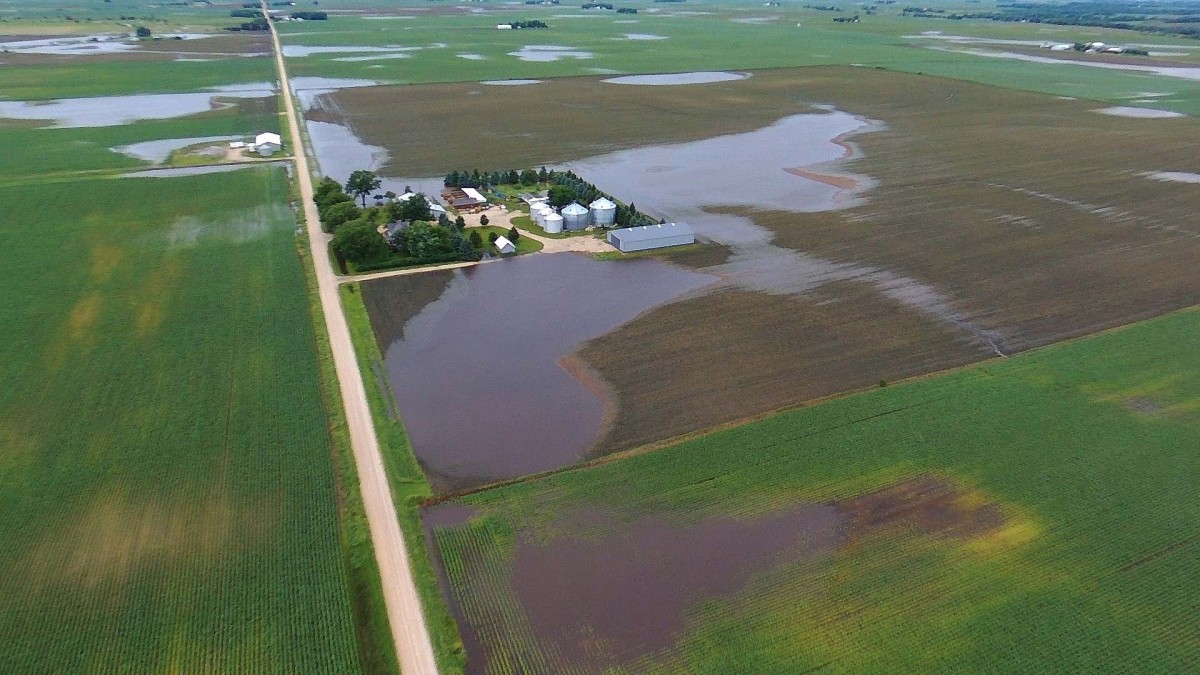
Figure 1: Drone image of variability in field as impacted by flooding. Source: https://www.pix4d.com/blog/drone-mapping-crop-insurance/
2. Late tillers: moisture later in the season may trigger the plants to produce late tillers. In some cases, poor plant establishment early season produces a thin/uneven plant stand that later produce tillers to compensate.
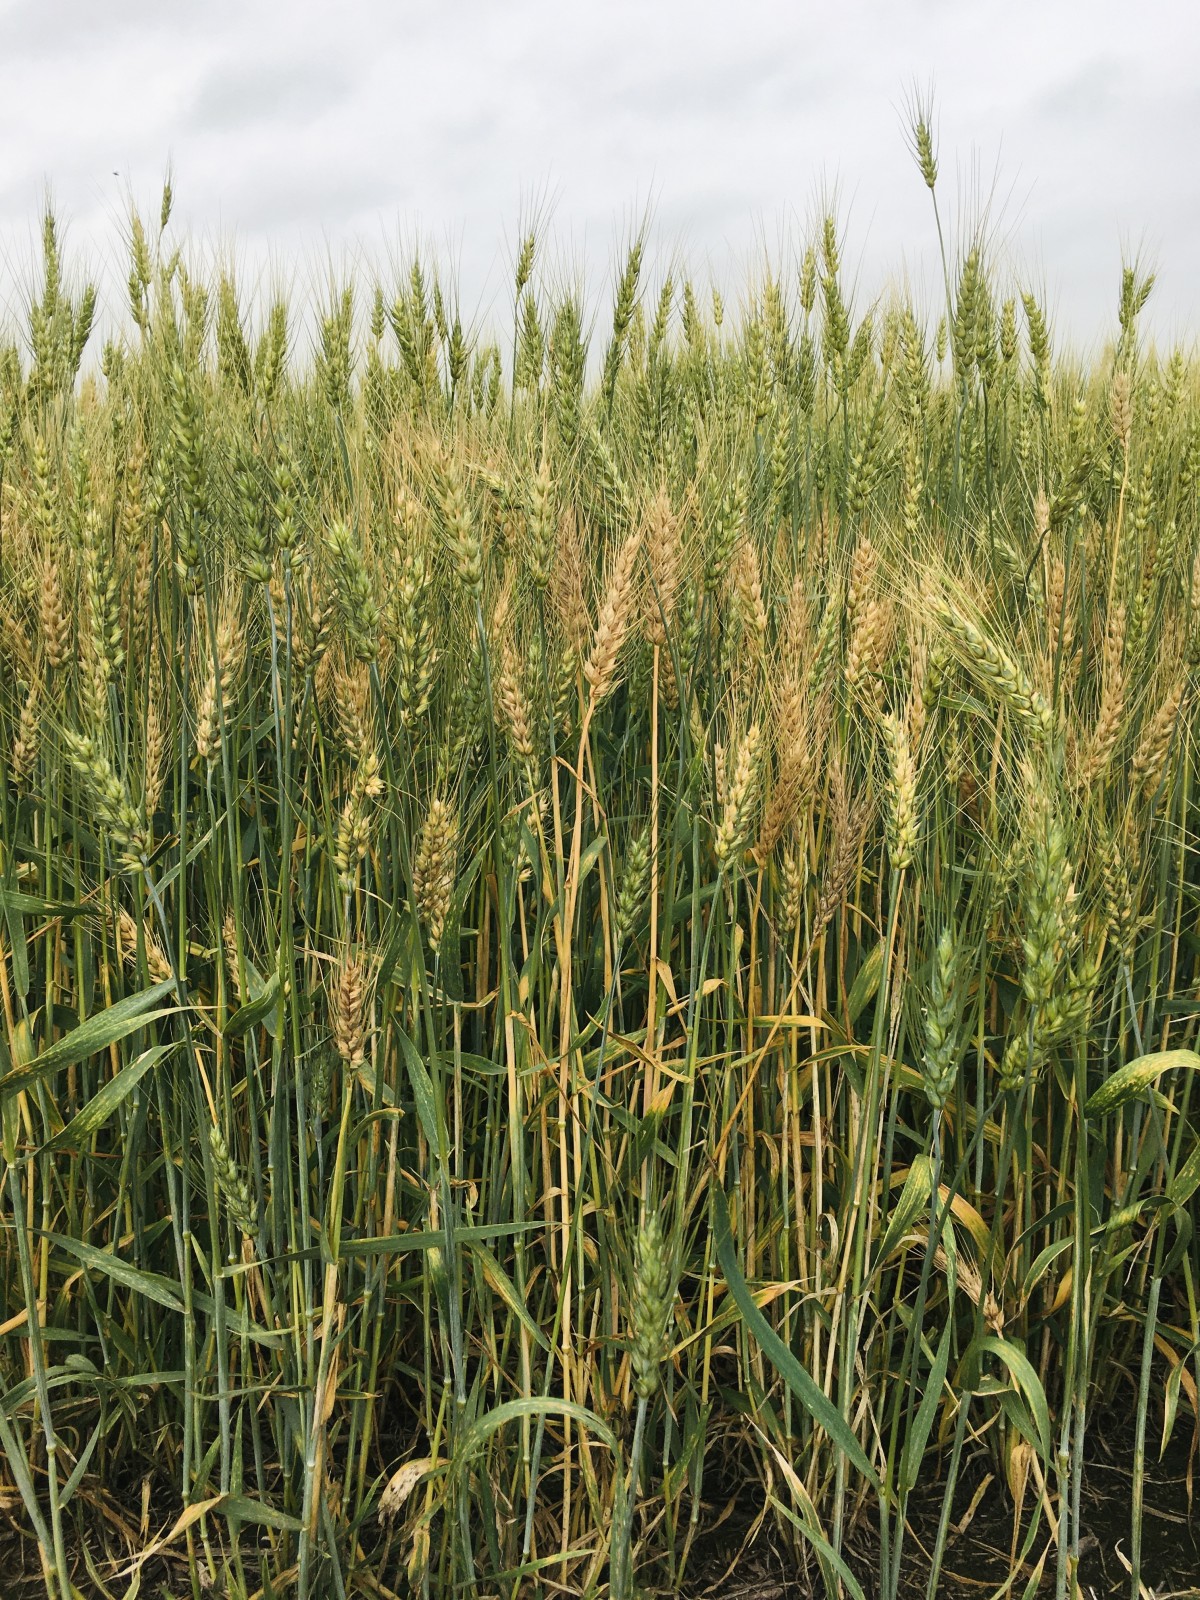
Figure 2: Later tillers due to mid-June rain after a dry spring.
Each scenario requires different management considerations. For the former case, the greener patches can be left to mature and harvested later, if they are a lot later-maturing than the rest of the field. The late tillers may be more challenging to harvest, as the mature heads may be right next to less mature heads that are 3 weeks behind in growth stage.
A few things to take note of while assessing the variable maturity:
1. What is the percentage of the yield that is in the later-maturing areas/tillers?
2. Estimate how much later the late-maturing areas are.
3. Are the late-maturing heads concentrating in specific patches or more scattered in the field?
These notes will help to decide what is the best strategy for managing variable maturity.
2. What are the strategies to manage variable maturity?
A few common strategies can be used to manage variable maturity:
a. Wait for later tillers to mature. This is an efficient one-pass operation. This strategy works best when there is ample time to wait for the later tillers to catch up, and if the weather is warm and dry. If the condition is wet and cold, the mature grains are at risk of pre-harvest sprouting if exposed to rain. Pre-harvest sprouting is a major downgrading factor in cereal crops. Sprouting activates an enzyme called alpha-amylase, which turns starch into sugar. As a result, the grain has lower falling number and baking quality.
b. Harvest the mature area first. If the late-maturing heads are concentrated in specific areas, while the rest of the fields are relatively uniform, then cutting around the green patches may be a good strategy. It lowers the risk of pre-harvest sprouting while leaving ample time for green patches to mature.
c. Swath the field. When the grain has reached physiological maturity (around 30% moisture), swathing speeds up the drying process and makes the heads dry evenly. It is a great tool to manage uneven maturity and dry down the straw and grains. The risk is swathing too early and getting green seed in the grains. Grass green seed is a grain grading factor. In CWRS, >2% grass green seeds will downgrade the grain to No. 3 CWRS. Also, if it rains while the crop is in the swath, it’s more difficult for them to dry compared to a standing crop. This introduces the risks of pre-harvest sprouting and yield reductions.
d. Use a harvest aid. Make sure to follow the label. None of the pre-harvest aids are registered to be used on wheat and barley before grain moisture reaches 30% or lower. Also check if the target market allows the active ingredients to be used. The most reliable and up-to-date information is on.
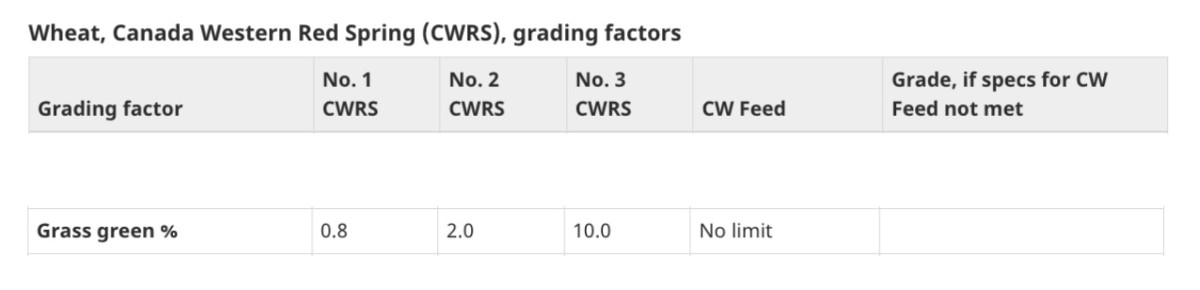
Table 1. Grain grading factors. Source: Canadian Grain Commission. https://www.grainscanada.gc.ca/en/grain-quality/official-grain-grading-guide/04-wheat/primary-grade-determination/cwrs-wheat.html
Each strategy has pros and cons. The best strategy to manage variable maturity varies farm-to-farm. It depends on the crop variability, yield potential, equipment available, whole farm logistics and weather conditions.
For example, if the late tillers are within 1-2 weeks later in growth stage, and they account for a significant percentage of yield, plus the weather looks warm and dry in the coming week, then waiting for late tillers to catch up and straight-cutting the whole field may be the best strategy. In contrast, if the difference between early and late tillers is too large, swathing may be a valuable tool. Especially for barley, where the early tillers may become overripe and shatter while waiting for the late tillers.
3. At what moisture can I take the crop off?
For swathing purposes, the crop can be swathed when they have reached ~30% grain moisture. At this stage, the crop has reached physiological maturity and maximum biomass accumulation. No yield penalty occurs by cutting the stem and putting the crop into a windrow.
However, for straight-cut, grains with 30% moisture are still too soft for the combine, increasing risks for mechanical grain damage. When the grain reaches around 20% moisture, the grain is more suitable to straight-cut. Cereal crops can be straight-cut at 18-20% moisture, if grain drying with supplemental heat is immediately available right after harvesting. Unheated natural air drying may take several weeks. Using this method to dry grains with >18% moisture risks grain spoilage before they reach the safe storage moisture.
If drying with supplemental heat is not available, grain is recommended to be harvested when it has reached around 16-17% moisture. At this moisture range, unheated natural air drying is sufficient to dry the grain to safe moisture for storage.
Though the grain moistures provide a general guideline for the ideal timing to harvest the grain, in real-life scenarios, moisture on the soil surface plays a big part in whether a combine can access a field. It is one of the determining factors in deciding when to harvest a certain field. The exact best solution differs at each farm, depending on field accessibility, crops’ sensitivity to pre-harvest wet conditions, dryer/storage capacity and the target market and pricing of each crop.
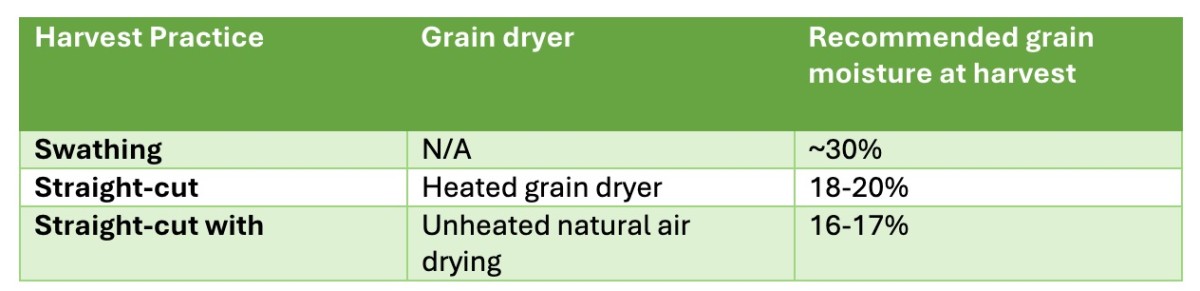
Table 2. Summary of recommended grain moisture for difference harvest-grain drying practices
4. How much does a good day dry down the grain?
Grains dry faster before they reach ~20% moisture. Between ~55% (early dough stage) and ~20% grain moisture, you can count on about 2% grain moisture decrease per day on a warm, dry day. On a cool, overcast day, the dry down per day is closer to 1%.
Grain dry down slows when the grain moisture is lower than 20%, as water molecules are more bound with other molecules, and the grain surface becomes less water permeable. In wet, cool days, the grain moisture may plateau for a short period.
5. What are the considerations when running a grain dryer?
For natural air drying, grain at the bottom of the drying bin dries first. The drying zone slowly moves to the top over the following weeks. The drying process is complete when the grain on the top of the bin is dry. Because natural air grain drying is slow, it is recommended to continuously operate the drying fans to keep moving the drying zone through the grain. Running the fan only during warm, dry weather may overly dry the grain at the bottom of the bin, while the grain on the top stays wet.
When natural air drying isn’t fast enough or sufficient to dry the grain to the target moisture, a small amount of supplementary heat of 1-2 °C can be added. The additional heat reduces RH by 3-10%, and further dries the grain by 0.75 to 1.0% moisture.
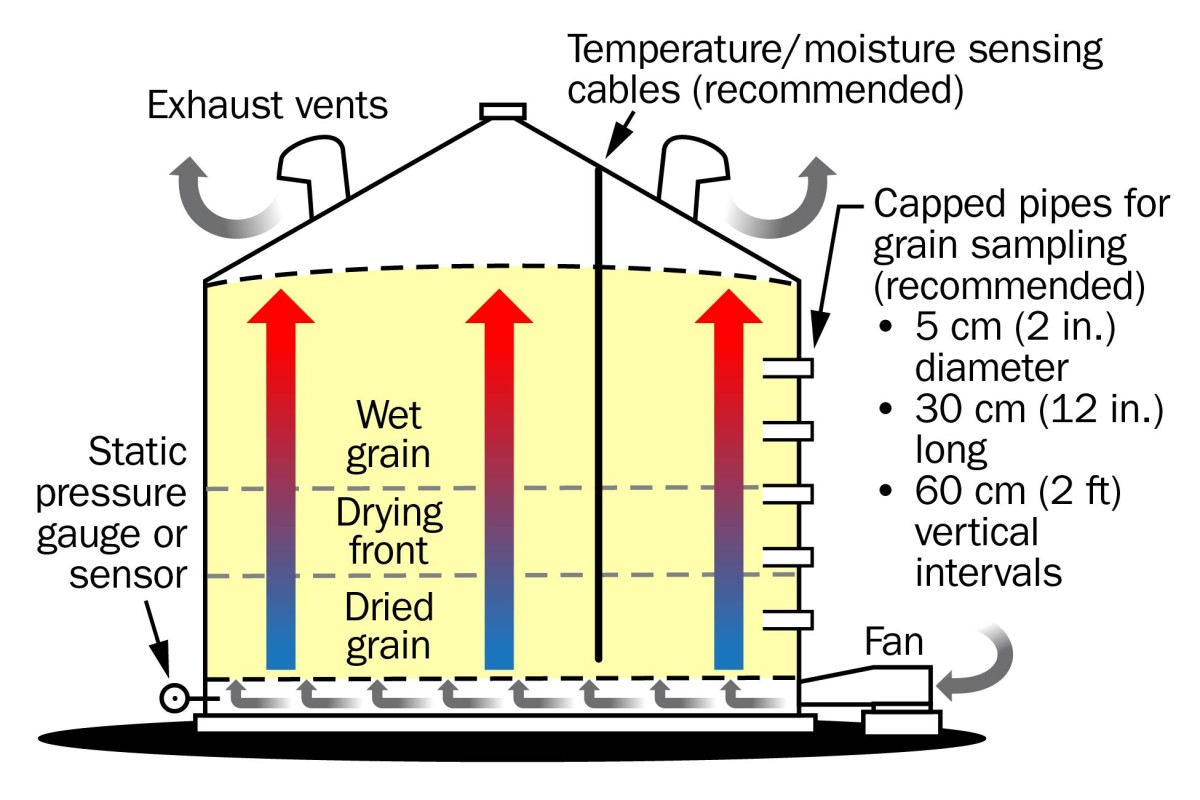
Figure 3. Natural-air drying bin showing the drying front as it moved up through the grain. Source: OMAFRA
High-temperature drying is a step up from natural air drying with added heat. It is efficient in drying grains with high moisture, bringing moisture down within hours or a few days. Though efficient, drying grains at high temperatures runs the risk of impacting starch quality, reducing germination and causing grain cracking. For this reason, keep wheat and barley kernel temperature below:
- 43 °C (110°F) for malt barley or grains destined for seed
- 60 °C (140°F) for milling grains
- 80-100°C for feed grains (due to less quality requirements)
Grain needs to be cooled for safe storage after high-temperature drying. The best way to do this is to move hot grain into storage and slowly cool it using natural air.
Combination drying can be used to achieve the highest energy efficiency and lower energy cost, according to studies by Dr. Chandra Singh’s lab at Lethbridge Polytechnic. In the experiment, grain with initial moisture of 19-20% was dried to 14-15% in dryers operated at 160-170°F (71-77°C) air temperature, drying 1400 to 1700 bushels per hour. After that, grain was moved to a 10,000 bushel bin to remove 1-1.5% additional grain moisture using 0.4-0.8 cubic feet per minute of air per bushel (cfm/bu) airflow rate.
Combination drying has the advantages of both high-temperature and natural air drying. It shortened the drying time of 8050 bushels of grain to approximately 9-14 days, compared to several weeks by natural air drying only. It was also 19-33% more energy efficient than high-temperature drying.
To determine if your grain has reached the safe moisture and temperature for storage, use the charts by the Canadian Grain Commission.
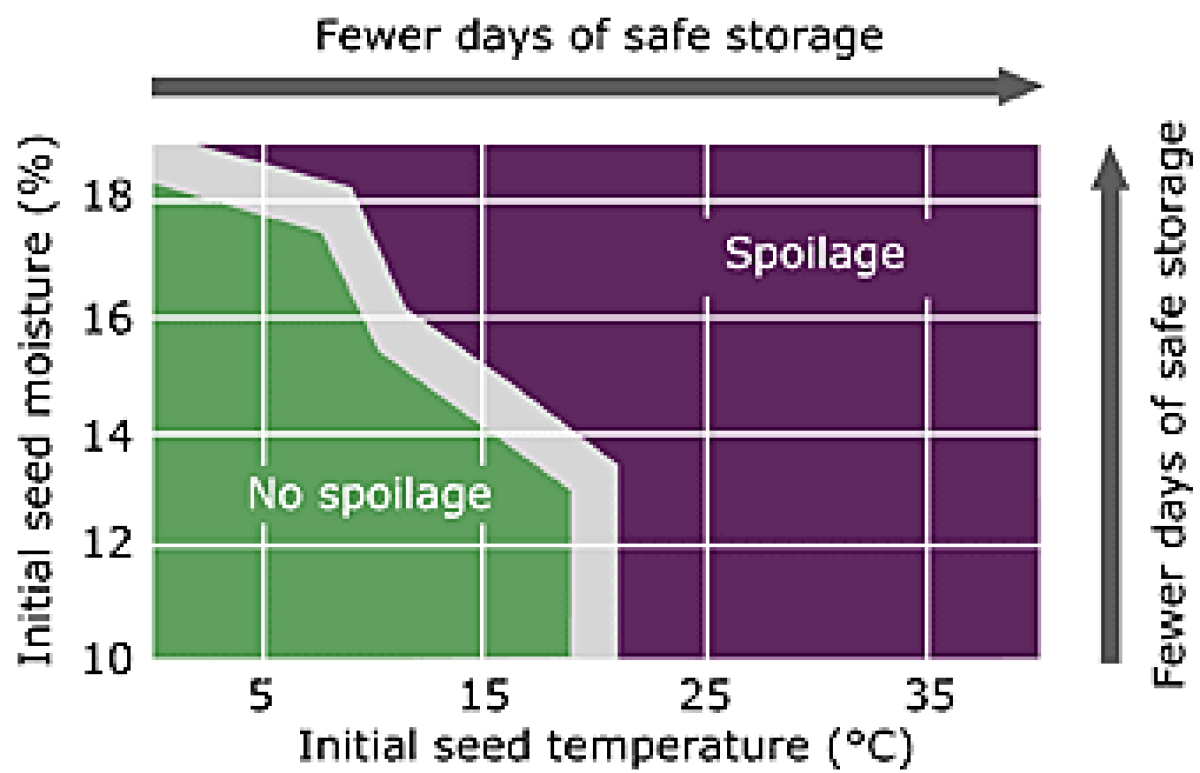
Figure 4. Safe storage chart for barley. Source: Canadian Grain Commission
Resources and reference
Drying wheat and barley - University of Minnesota Extension
Keep It Clean Product Advisory
Managing Late Tillers in Wheat and Barley – Factsheet
Natural-air grain drying – Ontario Ministry of Agriculture, Food and Agribusiness
Optimizing the on-farm wheat drying operation – The Growing Point article
Safe Storage Guidelines – Canadian Grain Commission
The Bluebook – Alberta’s Crop Protection Guide
Wheat Harvest Tips - Pioneer